Support TFG by using the links in our articles to shop. We receive a small commission (at no extra cost to you) so we can continue to create helpful free content. We earn from qualifying purchases made to the featured retailers. Thank you, we appreciate your support!
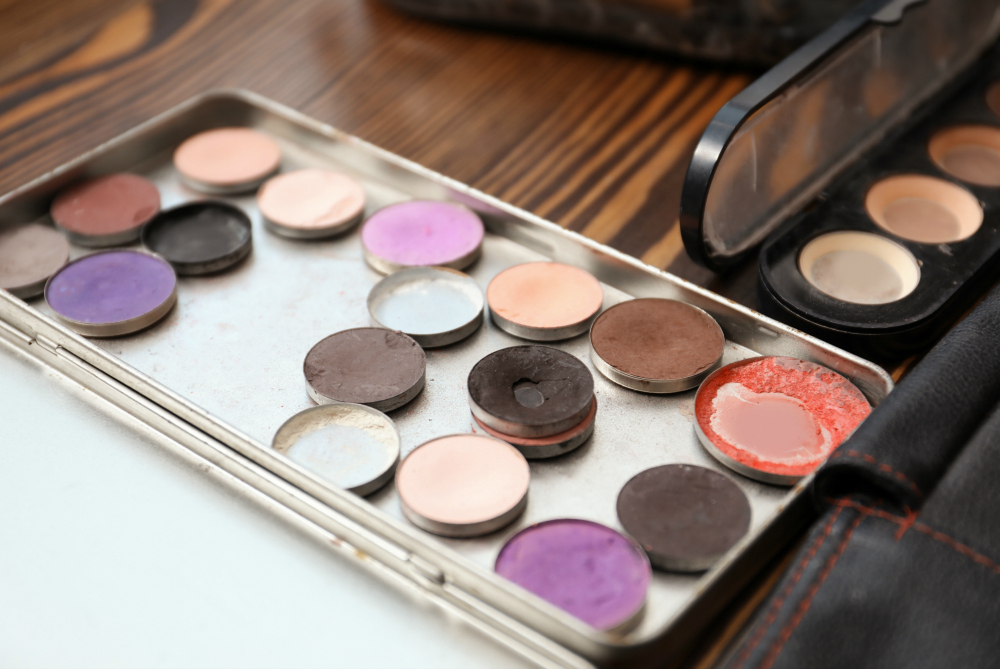
If you have old powder bronzers or eyeshadow hanging around in bits and pieces, you may want to put it together in a personalized case for travel. You may not get to customize your colors, but palette packing will be lighter by reducing the size of your makeup load.
How to Make a Travel Makeup Palette
Table Of Contents
Everyone has makeup favorites they swear by. Eyeshadow, in particular, comes in a myriad of colors and sizes, from cases with several shades to single pots with just one color. If you want to condense your most used colors down to an easy to pack selection, you can do this by creating your own DIY palette for your journey.
While that may sound daunting, it’s pretty easy, we promise! Read below for the products and instructions you’ll need to create your own case!
DIY Makeup Palette Products

A DIY makeup palette that comes with its own mixing well
This travel size palette is generally for lips, but that doesn’t mean you can’t use it for everything else like that must-have matte shadow or concealer. It packs a lot in a small frame with six wells and really lets you mix things up.
The compact measures 2.75” x 4” x .5” and is both sturdy and lightweight.
You’ll want to look your best when you travel! Read my travel tips to Pack Light Stylishly!

Make your own magnetic makeup palette in a pretty petal shape
This circular DIY makeup palette by 1PCS holds just about everything you can think of from your best shadows to your favorite glosses. There are five pans to choose from and its floral display is cute too! How convenient is that?

Remove and replace pans in this transparent makeup palette kit
This case by AOWA actually ships in twos—you get two units with 6 pans each! When you go through a beloved glitter eyeshadow, you can remove the empty pan from one kit and replace it with another favorite color from the second, or mix colors between the two depending on where you are going. This way, you’ll never be short on makeup combos while traveling!

JUVITUS Magnetic Compact Makeup Kit
This DIY makeup palette is the fairest of them all with its own mirror
This medium size cosmetic kit by JUVITUS comes with twelve 1” circular pans and a removable foam insert which you can take out to fit even bigger pans. The case is made from durable plastic and comes with a mirror the size of its lid, so you can check your face while on the go!

You can go in any direction with this DIY magnetic makeup palette
This is the type of magnetic makeup palette DIY your favorite YouTube makeup reviewers love! Allwon gives you a clean slate with which to create your own compact kit. Just make sure you use metal pans so they stick to the surface of the case.
This kit is big and can store up to 32 eyeshadow pans that are 1” in diameter or 18 pans that are 1.41” inches in diameter. However, you can mix and match as you see fit!
Pack lighter with a capsule makeup collection!
How to make your own makeup palette case step-by-step

Supplies you’ll need for your DIY makeup palette:
- Small makeup palette
- Powdered makeup
- Paper towels
- 91% isopropyl alcohol (91% works better than 70% rubbing alcohol)
- Latex gloves
- Small dish or plate to mix the powders and the alcohol
- Small spoons
- Paring knife
- A dental pick or toothpick—something with a point!

Claim your space for a little palette makeup creation
Are you ready for some creative palette DIY? Line your workspace before you begin with paper towels or work on a big tray. Powders can get messy.
Start with a case that’s a size you desire. I found this one on clearance at the grocery store for $1.50.

Empty it out with a pick and save the shadows in small baggies. When I did this, I saved one pan of shadow to use as is but crushed and removed the rest.

Clean with alcohol to remove any residue. I also took the labels off my kit with Goo Gone.

What cosmetics should you include in your DIY makeup palette?
Any powdered cosmetics should work. As an example, I knew I wanted to have a shared blusher/bronzer and powder foundation, in addition to the eyeshadows. You can even “share” a pan with different powers.
Looking to try earth-friendly makeup? Here are our favorite natural beauty products.

Prepping your powders for transfer to new pans in your homemade makeup palette
Crush up the powder you wish to put in new pans to a fine dust. Make sure to smash all the chunks you see. I used a plastic mini spoon to do this, and I even blended two shades of powder foundation to make a new color!

With an eyedropper or tiny spoon, slowly add isopropyl alcohol to your powder. Stir to make a paste.

Your makeup should now have a frosting-like consistency. If you add too much alcohol, you need to wait a few minutes until it starts to evaporate and makes the paste a little harder.
Hunting for great products? Here are 10 travel beauty products every jetsetter should own!

Filling the pans in your makeup travel palette
With a small spoon or spatula, put your paste in the desired spot, leaving it slightly above the level of the pan. Distribute it to all four corners of the pan evenly.
Just a note on how to make a magnetic makeup palette: you can fill your pans outside of the case before placing them in. Just make sure they’re metal so they stick to it when you’re done!

Leveling your DIY palette paste and drying the powder
Let the paste dry for 2-3 minutes.
Use your fingers to stamp down in the corners and level out the paste in the pan as you go. Remember, the paste should be a bit above the level of the pan.

However, if there is too much product and it’s spilling over the sides, shave some off with a paring knife.

Place a paper towel over the pan. With your fingertips, press down gently to start absorbing the alcohol and further level the paste. Do this until the paste is almost dried into a pressed powder. Don’t push too firmly, just try to absorb the excess alcohol, keeping the paste more or less level as it dries.
You may need to change paper towels. This step takes time.
Once the product is level, place a dry, paper towel over the pan and push down firmly with your fingers to compress the powder evenly, edges included. Do this several times, and replace the paper towel each time, until it no longer shows moisture coming up.
The trick is to be firm, but not too firm; you want your powders pressed, but not compacted to the point where they are too hard to use.

If you want a smooth surface, after pressing with the paper towel, cover the pan with a piece of plastic wrap and push down.
Allow 24 hours for the powder to harden and the pan to fully dry. Leave the cover up so that any moisture in the powder evaporates. Once dry, you can use the tip of a knife, or a toothpick to clean up a pan’s edges.
Products can share a pan. To do this, just cut a straight line on the edge of one of the products as it dries, before you add something next to it or you can add all the different colors at once.
Check out these 7 clever travel makeup hacks!

Your finished compact makeup palette
You can use pans of any size and configuration to customize your case, include metal pans for a DIY magnetic palette.

This one has a bit of powder concealer, combined with a blush. I added both pastes at the same time.

Scrape off any excess powder that may have collected on the palette’s edges with a knife and clean with alcohol.

This DIY makeup eyeshadow palette is one of my favorites and normally contains two eyeshadows. My new one, however, contains six eyeshadows and one powdered concealer and is 2.25” long, by 1.5” wide.

This case has concealer and two shades of bronzer and blush.
Take a look at these tips on the best eyebrow makeup for travelers!
The pros and cons of a DIY makeup palette
Pros
- You can take several of your favorite cosmetics with you in one container.
- You’re not stuck with colors that come in whatever pre-made case you buy.
- You can add products together that you wouldn’t normally see, like powder concealer in an eyeshadow palette.
- A travel pallete is perfect for those who take trips only a few times a year.
Cons
- The consistency of the shadows and powders that you add to an empty case can vary slightly from the originals, based on the pressure applied when the powder is drying. Experiment with how much to apply. You want enough to hold the powder firmly together, but too much will make it hard to put powder on an applicator.
Have fun, experiment, and breathe new life into old cracked powdered makeup with a DIY makeup mixing palette.
DIY Makeup Palette Comparison Chart
[wpsm_comparison_table id=”126″ class=”center-table-align”]

How to Pack a Makeup Travel Kit
When it comes time to pack your makeup, you’ll want to consider a makeup bag to keep it separate and neat in your luggage. Consider a small cosmetic bag that can fit easily into your toiletry bag.
You also can wrap your makeup bag in clothing and add to your packing cube in your suitcase to better protect it. Even if you travel carry-on only, your bag may be put into an overhead bin, under a seat, or hauled up flights of stairs. You don’t want to break your products.
Only pack what you think you really will need and use. Watch the video above for tips on how to downsize your beauty products.
However, if something does happen to your makeup or beauty supplies, if you forget something, or if you need something, you can buy products at your destination.
Get our free printable makeup checklist here!
What is your DIY makeup palette? Let us know in the comments!
Please read these posts for more ideas on travel make-up:
- 5 Best Makeup Palettes for Travel
- Travel Makeup: Facing the Day
- The Ultimate Guide to Travel Makeup (with Printable Checklist)
- Pack Lighter with a Capsule Makeup Collection
LIKED THIS POST? PIN THIS PIC TO SAVE IT!

I hope you found this post on how to make a travel makeup palette useful. Don’t forget to share with your friends on Facebook, Twitter and Pinterest. Thanks for reading!

Author Bio: Heidi Barry-Rodriguez is an explorer-librarian with a love of books, travel, her husband, and two cats. She loves train travel and the mobility, serendipity and freedom that are afforded by packing lightly. Check out her podcast episode on packing light!


I took a dollar store eyeshadow compact and did the same thing but with lipstick. It’s my mini-lip palate! I love it so much after my trip I officially downsized to my travel kit for everyday use. I’m looking for the perfect compact to use for all my powders (shadow, blush, foundation).
Hi Jessica, thank you for sharing how you made your diy makeup palette with us, love the idea of creating a mini-lip palette!! Happy travels! ?
This is a great idea you can save so much money doing this. I have been doing this for years now actually I’m glad others are doing it as well.
This is the best makeup idea I’ve ever heard – a million thank you’s for writing about this!!!
Hi, thank you so much for your feedback, so glad that you found it helpful! 🙂
I’ve been pouring over travel blogs for months and this is such a great, unique idea! I just tried making mine and it worked great–I fit a lip color, blush, 2 eye/brow shadows, and a face powder all in one little bitty pallete. I even used one of my extra now empty palletes to make some play makeup for my daughter (with some nail polish :-). Thanks for this trick!
Thanks Skye! We do our best 🙂
Awesome. I have always wanted to do this but never have!!
I can’t wait to try this! I wonder if this will work with loose mineral eyeshadows (not sure if the alcohol would change the minerals). I have also seen people press a quarter on top of the paper towel to level it out.